Federated Authentication Utilizing Apache & SSSD
| Author: | John Dennis |
|---|---|
| Email: | jdennis@redhat.com |
Table of Contents
- Federated Authentication Utilizing Apache & SSSD
- Introduction
- Configuration Guide
- How Apache Identity Metadata is Processed in AAA
- The Mapping Rule Processor
- Security Considerations
- Appendix
Introduction
Applications should not need to handle the burden of authentication and authorization. These are complex technologies further complicated by the existence of a wide variety of authentication mechanisms. Likewise there are numerous identity providers (IdP) which one may wish to utilize, perhaps in a federated manner. The potential to make critical mistakes are high while consuming significant engineering resources. Ideally an application should "outsource" it's authentication to an "expert" and avoid unnecessary development costs.
For web based applications (both conventional HTML and REST API) there has been a trend to embed a simple HTTP server in the application or application server which handles the HTTP requests eschewing the use of a traditional web server such as Apache.
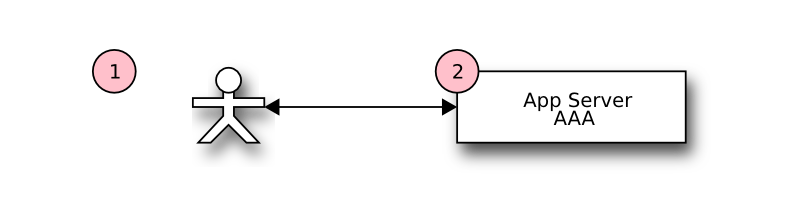
Figure 1.
But traditional web servers have a lot of advantages. They often come with extensive support for technologies you might wish to utilize in your application. It would require signification software engineering to add support for those technologies in your application. The problem is compounded by the fact many of these technologies demand domain expertise which is unlikely to be available in the application development team. Another problem is the libraries needed to utilize the technology may not even be available in the programming language the application is being developed in. Fundamentally an application developer should focus on developing their application instead of investing resources into implementing complex code for the ancillary technologies the application may wish to utilize.
Therefore fronting your application with a web server such as Apache makes a lot of sense. One should allow Apache to handle complex tasks such as multiple authentication mechanisms talking to multiple IdP's. Suppose you want your application to handle Single Sign-On (SSO) via Kerberos or authentication based on X509 certificates (i.e. PKI). Apache already has extensions to handle these which have been field proven, it would be silly to try and support these in your application. Apache also comes with other useful extensions such as mod_identity_lookup which can extract metadata about an authenticated user from multiple sources such as LDAP, Active Directory, NIS, etc.
By fronting your application with Apache and allowing Apache to handle the complex task of authentication, identity lookups etc. you've greatly increased the features of your application while at the same time reducing application development time along with increasing application security and robustness.
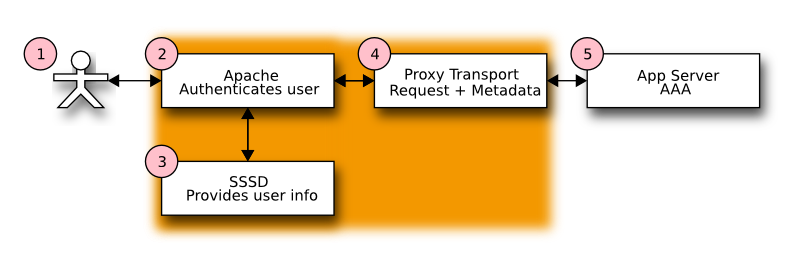
Figure 2.
When Apache fronts your application you will be passed the results of authentication and identity lookups. Your application only needs a simple mechanism to accept these values. There are a variety of ways the values can be passed from Apache to your application which will be discussed in later sections.
Authentication & Identity Properties
Authentication is proving that a user is who they claim to be, in other words after authentication the user has a proven identity. In security parlance the authenticated entity is call a principal. Principals may be humans, machines or services. Authorization is distinct from authentication. Authorization declares what actions an authenticated principal may perform. For example, does a principal have permission to read a certain file, run a specific command, etc. Identity metadata is typically bound to the principal to provide extra information. Examples include the users full name, their organization, the groups they are members of, etc.
Apache can provide both authentication and identity metadata to an application freeing the application of this task. Authorization usually will remain the province of the application. A typical design pattern is to assign roles to a principal based on identity properties. As the application executes on behalf of a principal the application will check if the principal has the necessary role needed to perform the operation.
Apache ships with a wide variety of authentication modules. After an Apache authentication module successfully authenticates a principal, it sets internal variables identifying the principal and the authentication method used to authenticate the principal. These are exported as the CGI variables REMOTE_USER and AUTH_TYPE respectively (see CGI Export Issues for further information).
Identity Properties
Most Apache authentication modules do not have access to any of the identity properties bound to the authenticated principal. Those identity properties must be provided by some other mechanism. Typical mechanisms include lookups in LDAP, Active Directory, NIS, POSIX passwd/gecos and SQL. Managing these lookups can be difficult especially in a networked environment where services may be temporarily unavailable and/or in a enterprise deployment where identity sources must be multiplexed across a variety of services according to enterprise wide policy.
SSSD (System Security Services Daemon) is designed to alleviate many of the problems surrounding authentication and identity property lookup. SSSD can provide identity properties via D-Bus using it's InfoPipe (IFP) feature. The mod_identity_lookup Apache module is given the name of the authenticated principal and makes available identity properties via Apache environment variables (see Configure SSSD IFP for details).
Exporting & Consuming Identity Metadata
The authenticated principal (REMOTE_USER), the mechanism used to authenticate the principal (AUTH_TYPE) and identity properties (supplied by SSSD IFP) are exported to the application which trusts this metadata to be valid.
How is this identity metadata exported from Apache and then be consumed by a Java EE Servlet?
The architectural design inside Apache tries to capitalize on the existing CGI standard (CGI RFC) as much as possible. CGI defines these relevant environment variables:
- REMOTE_USER
- AUTH_TYPE
- REMOTE_ADDR
- REMOTE_HOST
Transporting Identity Metadata from Apache to a Java EE Servlet
In following figure we can see that the user connects to Apache instead of the servlet container. Apache authenticates the user, looks up the principal's identity information and then proxies the request to the servlet container. The additional identity metadata must be included in the proxy request in order for the servlet to extract it.
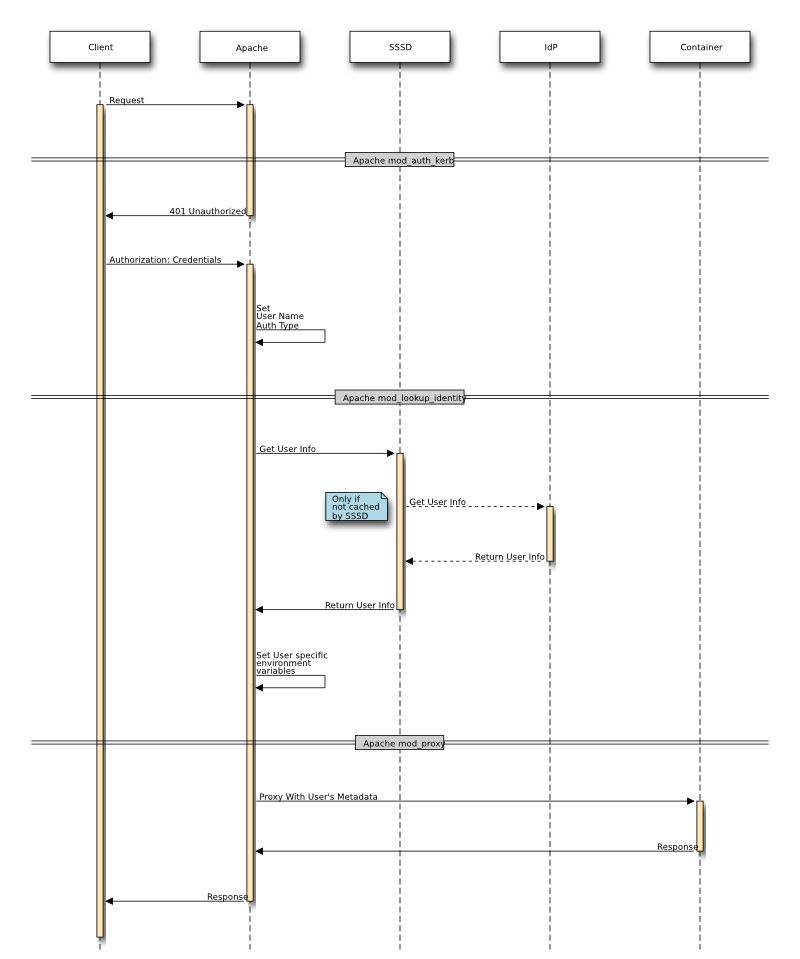
Figure 3.
The Java EE Servlet API is designed with the HTTP protocol in mind however the servlet never directly accesses the HTTP protocol stream. Instead it uses the servlet API to get access to HTTP request data. The responsibility for HTTP communication rests with the container's Connector objects. When the servlet API needs information it works in conjunction with the Connector to supply it. For example the HttpServletRequest.getRemoteHost() method interrogates information the Connector placed on the internal request object. Analogously HttpServletRequest.getRemoteUser() interrogates information placed on the internal request object by an authentication filter.
But what happens when a HTTP request is proxied to a servlet container by Apache and getRemoteHost() or getRemoteUser() is called? Most Connector objects do not understand the proxy scenario, to them a request from a proxy looks just like a request sent directly to the servlet container. Therefore getRemoteHost() or getRemoteUser() ends up returning information relative to the proxy instead of the user who connected to the proxy because it's the proxy who connected to the servlet container and not the end user. There are 2 fundamental approaches which allow the servlet API to return data supplied by the proxy:
- Proxy uses special protocol (e.g. AJP) to embed metadata.
- Metadata is embedded in an HTTP extension by the proxy (i.e. headers)
Proxy With AJP Protocol
The AJP protocol was designed as a protocol to exchange HTTP requests and responses between Apache and a Java EE Servlet Container. One of its design goals was to improve performance by translating common text values appearing in HTTP requests to a more compact binary form. At the same time AJP provided a mechanism to supply metadata about the request to the servlet container. That metadata is encoded in an AJP attribute (a name/value pair). The Apache AJP Proxy module looks up information in the internal Apache request object (e.g. remote user, remote address, etc.) and encodes that metadata in AJP attributes. On the servlet container side a AJP Connector object is aware of these metadata attributes, extracts them from the protocol and supplies their values to the upper layers of the servlet API. Thus a call to HttpServletRequest.getRemoteUser() made by a servlet will receive the value set by Apache prior to the proxy. This is the desired and expected behavior. A servlet should be ignorant of the consequences of proxies; the servlet API should behave the same regardless of the presence of a proxy.
The AJP protocol also has a general purpose attribute mechanism whereby any arbitrary name/value pair can be passed. This proxy metadata can be retrieved by a servlet by calling ServletRequest.getAttribute() [1] When Apache mod_proxy_ajp is being used the authentication metadata for the remote user and auth type are are automatically inserted into the AJP protocol and the AJP Connector object on the servlet receiving end supplies those values to HttpServletRequest.getRemoteHost() and HttpServletRequest.getRemoteUser() respectively. But the identity metadata supplied by mod_identity_lookup needs to be explicitly encoded into an AJP attribute (see Configure SSSD IFP for details) that can later be retrieved by ServletRequest.getAttribute().
Proxy With HTTP Protocol
Although the AJP protocol offers a number of nice advantages sometimes it's not an option. Not all servlet containers support AJP or there may be some other deployment constraint that precludes its use. In this case option 2 from above needs to be used. Option 2 requires only the defined HTTP protocol be used without any "out of band" metadata. The conventional way to attach extension metadata to a HTTP request is to add extension HTTP headers.
One problem with using extension HTTP headers to pass metadata to a servlet is the expectation the servlet API will have the same behavior. In other words the value returned by HttpServletRequest.getRemoteUser() should not depend on whether the proxy request was exchanged with the AJP protocol or the HTTP protocol. The solution to this is to wrap the HttpServletRequest object in a servlet filter. The wrapper overrides certain request methods (e.g. getRemoteUser()). The override method looks to see if the metadata is in the extension HTTP headers, if so it returns the value found in the extension HTTP header otherwise it defers to the existing servlet implementation. The ServletRequest.getAttribute() is overridden in an analogous manner in the wrapper filter. Any call to ServletRequest.getAttribute() is first checked to see if the value exists in the extension HTTP header first.
Metadata supplied by Apache that is not part of the normal Java EE Servlet API always appears to the servlet via the ServletRequest.getAttribute() method regardless of the proxy transport mechanism. The consequence of this is a servlet continues to utilize the existing Java EE Servlet API without concern for intermediary proxies, and any other metadata supplied by a proxy is always retrieved via ServletRequest.getAttribute() (see the caveat about ServletRequest.getAttributeNames() [1]).
Configuration Guide
Although Apache authentication and SSSD identity lookup can operate with a variety of authentication mechanisms, IdP's and identity metadata providers we will demonstrate a configuration example which utilizes the FreeIPA IdP. FreeIPA excels at Kerberos SSO authentication, Active Directory integration, LDAP based identity metadata storage and lookup, DNS services, host based RBAC, SSH key management, certificate management, friendly web based console, command line tools and many other advanced IdP features.
The following configuration steps will need to be performed:
- Install FreeIPA by following the installation guides in the FreeIPA documentation area. When you install FreeIPA you will need to select a realm (a.k.a domain) in which your users and hosts will exist. In our example we will use the EXAMPLE.COM realm.
- Install and configure the Apache HTTP web server. The recommendation is to install and run the Apache HTTP web server on the same system the Java EE Container running AAA is installed on.
- Configure the proxy connector in the Java EE Container and set the secureProxyPorts.
We will also illustrate the operation of the system by adding an example user named testuser who will be a member of the odl_users and odl_admin groups.
Add Example User and Groups to FreeIPA
After installing FreeIPA you will need to populate FreeIPA with your users, groups and other data. Refer to the documentation in FreeIPA for the variety of ways this task can be performed; it runs the gamut from web based console to command line utilities. For simplicity we will use the command line utilities.
Identify yourself to FreeIPA as an administrator; this will give you the necessary privileges needed to create and modify data in FreeIPA. You do this by obtaining a Kerberos ticket for the admin user (or any other user in FreeIPA with administrator privileges.
% kinit admin@EXAMPLE.COM
Create the example odl_users and odl_admin` groups.
% ipa group-add odl_users --desc 'OpenDaylight Users'
% ipa group-add odl_admin --desc 'OpenDaylight Administrators'
Create the example user testuser with the first name "Test" and a last name of "User" and an email address of "test.user@example.com"
% ipa user-add testuser --first Test --last User --email test.user@example.com
Now add testuser to the odl_users and odl_admin groups.
% ipa group-add-member odl_users --user testuser
% ipa group-add-member odl_admin --user testuser
Configure Apache
A number of Apache configuration directives will need to be specified to implement the Apache to application binding. Although these configuration directives can be located in any number of different Apache configuration files the most sensible approach is to co-locate them in a single application configuration file. This greatly simplifies the deployment of your application and isolates your application configuration from other applications and services sharing the Apache installation. In the examples that follow our application will be named my_app and the Apache application configuration file will be named my_app.conf which should be located in Apache's conf.d/ directory. The web resource we are protecting and supplying identity metadata for will be named my_resource.
Configure Apache for Kerberos
When FreeIPA is deployed Kerberos is the preferred authentication mechanism for Single Sign-On (SSO). FreeIPA also provides identity metadata via Apache mod_identity_lookup. To protect your my_resource resource with Kerberos authentication identify your resource as requiring Kerberos authentication in your my_app.conf Apache configuration. For example:
<Location my_resource>
  AuthType Kerberos
  AuthName "Kerberos Login"
  KrbMethodNegotiate On
  KrbMethodK5Passwd Off
  KrbAuthRealms EXAMPLE.COM
  Krb5KeyTab /etc/http.keytab
  require valid-user
</Location>
You will need to replace EXAMPLE.COM in the KrbAuthRealms declaration with the Kerberos realm for your deployment.
Configure SSSD IFP
To use the Apache mod_identity_lookup module to supply identity metadata you need to do the following in my_app.conf:
Enable the module
LoadModule lookup_identity_module modules/mod_lookup_identity.so
Apply the identity metadata lookup to specific URL's (e.g. my_resource) via an Apache location directive. In this example we look up the "mail" attribute and assign it to the REMOTE_USER_EMAIL environment variable.
<LocationMatch "my_resource">
  LookupUserAttr mail REMOTE_USER_EMAIL
</LocationMatch>
Export the environment variable via the desired proxy protocol, see Exporting Environment Variables to the Proxy
Exporting Environment Variables to the Proxy
First you need to decide which proxy protocol you're going to use, AJP or HTTP and then determine the target address and port to proxy to. The recommended configuration is to run both the Apache server and the servlet container on the same host and to proxy requests over the local loopback interface (see Declaring the Connector Ports for Authentication Proxies). In our examples we'll use port 8383. Thus in my_app.conf add a proxy declaration.
For HTTP Proxy
ProxyPass / http://localhost:8383/
ProxyPassReverse / http://localhost:8383/
For AJP Proxy
ProxyPass / ajp://localhost:8383/
ProxyPassReverse / ajp://localhost:8383/
AJP Exports
AJP automatically forwards REMOTE_USER and AUTH_TYPE making them available to the HttpServletRequest API, thus you do not need to explicitly forward these in the proxy configuration. However all other mod_identity_lookup metadata must be explicitly forwarded as an AJP attribute. These AJP attributes become visible in the ServletRequest.getAttribute() method [1].
The Apache mod_proxy_ajp module automatically sends any Apache environment variable prefixed with "AJP_" as an AJP attribute which can be retrieved with ServletRequest.getAttribute(). Therefore the mod_identity_lookup directives which specify the Apache environment variable to set with the result of a lookup must be prefixed with "AJP_". Using the above example of looking up the principal's email address we modify the environment variable to include the "AJP_" prefix. Thusly:
<LocationMatch "my_resource">
  LookupUserAttr mail AJP_REMOTE_USER_EMAIL
</LocationMatch>
The sequence of events is as follows:
- When the URL matches "my_resource".
- mod_identity_lookup retrieves the mail attribute for the principal.
- mod_identity_lookup assigns the value of the mail attribute lookup to the AJP_REMOTE_USER_EMAIL Apache environment variable.
- mod_proxy_ajp encodes AJP_REMOTE_USER_EMAIL environment variable into an AJP attribute in the AJP protocol because the environment variable is prefixed with "AJP_". The name of the attribute is stripped of it's "AJP_" prefix thus the AJP_REMOTE_USER_EMAIL environment variable is transferred as the AJP attribute REMOTE_USER_EMAIL.
- The request is forwarded (i.e. proxied) to servlet container using the AJP protocol.
- The servlet container's AJP Connector object is assigned each AJP attribute to the set of attributes on the ServletRequest attribute list. Thus a call to ServletRequest.getAttribute("REMOTE_USER_EMAIL") yields the value set by mod_identity_lookup.
HTTP Exports
When HTTP proxy is used there are no automatic or implicit metadata transfers; every metadata attribute must be explicitly handled on both ends of the proxy connection. All identity metadata attributes are transferred as extension HTTP headers, by convention those headers are prefixed with "X-SSSD-".
Using the original example of looking up the principal's email address we must now perform two independent actions:
- Lookup the value via mod_identity_lookup and assign to an Apache environment variable.
- Export the environment variable in the request header with the "X-SSSD-" prefix.
<LocationMatch "my_resource">
  LookupUserAttr mail REMOTE_USER_EMAIL
  RequestHeader set X-SSSD-REMOTE_USER_EMAIL %{REMOTE_USER_EMAIL}e
</LocationMatch>
The sequence of events is as follows:
- When the URL matches "my_resource".
- mod_identity_lookup retrieves the mail attribute for the principal.
- mod_identity_lookup assigns the value of the mail attribute lookup to the REMOTE_USER_EMAIL Apache environment variable.
- Apache's RequestHeader directive executes just prior to the request being forwarded (i.e. in the Apache fixup stage). It adds the header X-SSSD-REMOTE_USER_EMAIL and assigns the value for REMOTE_USER_EMAIL found in the set of environment variables. It does this because the syntax %{XXX} is a variable reference for the name XXX and the 'e' appended after the closing brace indicates the lookup is to be performed in the set of environment variables.
- The request is forwarded (i.e. proxied) to the servlet container using the HTTP protocol.
- When ServletRequest.getAttribute() is called the SssdFilter wrapper intercepts the getAttribute() method. It looks for an HTTP header of the same name with "X-SSSD-" prefixed to it. In this case getAttribute("REMOTE_USER_EMAIL") causes the lookup of "X-SSSD-REMOTE_USER_EMAIL" in the HTTP headers, if found that value is returned.
AJP Proxy Example Configuration
If you are using AJP proxy to the Java EE Container on port 8383 your my_app.conf Apache configuration file will probably look like this:
<LocationMatch "my_resource">

  ProxyPass / ajp://localhost:8383/
  ProxyPassReverse / ajp://localhost:8383/

  LookupUserAttr mail AJP_REMOTE_USER_EMAIL " "
  LookupUserAttr givenname AJP_REMOTE_USER_FIRSTNAME
  LookupUserAttr sn AJP_REMOTE_USER_LASTNAME
  LookupUserGroups AJP_REMOTE_USER_GROUPS ":"

</LocationMatch>
Note the specification of the colon separator for the LookupUserGroups operation. [3]
HTTP Proxy Example Configuration
If you are using a conventional HTTP proxy to the Java EE Container on port 8383 your my_app.conf Apache configuration file will probably look like this:
<LocationMatch "my_resource">

  ProxyPass / http://localhost:8383/
  ProxyPassReverse / http://localhost:8383/

  RequestHeader set X-SSSD-REMOTE_USER expr=%{REMOTE_USER}
  RequestHeader set X-SSSD-AUTH_TYPE expr=%{AUTH_TYPE}
  RequestHeader set X-SSSD-REMOTE_HOST expr=%{REMOTE_HOST}
  RequestHeader set X-SSSD-REMOTE_ADDR expr=%{REMOTE_ADDR}

  LookupUserAttr mail REMOTE_USER_EMAIL
  RequestHeader set X-SSSD-REMOTE_USER_EMAIL %{REMOTE_USER_EMAIL}e

  LookupUserAttr givenname REMOTE_USER_FIRSTNAME
  RequestHeader set X-SSSD-REMOTE_USER_FIRSTNAME %{REMOTE_USER_FIRSTNAME}e

  LookupUserAttr sn REMOTE_USER_LASTNAME
  RequestHeader set X-SSSD-REMOTE_USER_LASTNAME %{REMOTE_USER_LASTNAME}e

  LookupUserGroups REMOTE_USER_GROUPS ":"
  RequestHeader set X-SSSD-REMOTE_USER_GROUPS %{REMOTE_USER_GROUPS}e

</LocationMatch>
Note the specification of the colon separator for the LookupUserGroups operation. [3]
Configure Java EE Container Proxy Connector
The Java EE Container must be configured to listen for connections from the Apache web server. A Java EE Container specifies connections via a Connector object. A Connector must be dedicated exclusively for handling authenticated requests from the Apache web server. The reason for this is explained in The Proxy Problem. In addition ClaimAuthFilter needs to validate that any request it processes originated from the trusted Apache instance. This is accomplished by dedicating one or more ports exclusively for use by the trusted Apache server and enumerating them in the secureProxyPorts configuration as explained in Locking Down the Apache to Java EE Container Channel and Declaring the Connector Ports for Authentication Proxies.
Configure Tomcat Proxy Connector
The Tomcat Java EE Container defines Connectors in its server.xml configuration file.
<Connector
    address="127.0.0.1"
    port="8383"
    protocol="HTTP/1.1"
    tomcatAuthentication="false"
    connectionTimeout="20000"
    redirectPort="8443"
/>
| address: | This should be the loopback address as explained Locking Down the Apache to Java EE Container Channel. |
|---|---|
| port: | In our examples we've been using port 8383 as the proxy port. The exact port is not important but it must be consistent with the Apache proxy port, the Connector declaration, and the port value in secureProxyPorts. |
| protocol: | As explained in Transporting Identity Metadata from Apache to a Java EE Servlet you will need to decide if you are using HTTP or AJP as the proxy protocol. In the example above the protocol is set for HTTP, if you use AJP instead the protocol should instead be "AJP/1.3". |
| tomcatAuthentication: | |
| This boolean flag tells Tomcat whether Tomcat should perform authentication on the incoming requests or not. Since authentication is performed by Apache we do not want Tomcat to perform authentication therefore this flag must be set to false. | |
The AAA system needs to know which port(s) the trusted Apache proxy will be sending requests on so it can trust the request authentication metadata. See Declaring the Connector Ports for Authentication Proxies for more information). Set secureProxyPorts in the FederationConfiguration.
secureProxyPorts=8383
Configure Jetty Proxy Connector
The Jetty Java EE Container defines Connectors in its jetty.xml configuration file.
<!-- Trusted Authentication Federation proxy connection -->
<Call name="addConnector">
    <Arg>
        <New class="org.eclipse.jetty.server.nio.SelectChannelConnector">
            <Set name="host">127.0.0.1</Set>
            <Set name="port">8383</Set>
            <Set name="maxIdleTime">300000</Set>
            <Set name="Acceptors">2</Set>
            <Set name="statsOn">false</Set>
            <Set name="confidentialPort">8445</Set>
            <Set name="name">federationConn</Set>
            <Set name="lowResourcesConnections">20000</Set>
            <Set name="lowResourcesMaxIdleTime">5000</Set>
        </New>
    </Arg>
</Call>
| host: | This should be the loopback address as explained Locking Down the Apache to Java EE Container Channel. |
|---|---|
| port: | In our examples we've been using port 8383 as the proxy port. The exact port is not important but it must be consistent with the Apache proxy port, the Connector declaration, and the port value in secureProxyPorts. |
Note, values in Jetty XML can also be parameterized so that they may be passed from property files or set on the command line. Thus typically the port is set within Jetty XML, but uses the Property element to be customizable. Thus the above host and port properties could be specificed this way:
<Set name="host">
    <Property name="jetty.host" default="127.0.0.1"/>
</Set>
<Set name="port">
    <Property name="jetty.port" default="8383"/>
</Set>
The AAA system needs to know which port(s) the trusted Apache proxy will be sending requests on so it can trust the request authentication metadata. See Declaring the Connector Ports for Authentication Proxies for more information). Set secureProxyPorts in the FederationConfiguration.
How Apache Identity Metadata is Processed in AAA
Figure 2. and Figure 3. illustrates the fact the first stage in processing a request from a user begins with Apache where the user is authenticated and SSSD supplies additional metadata about the user. The original request along with the metadata are subsequently forwarded by Apache to the Java EE Container. Figure 4. illustrates the processing inside the Java EE Container once it receives the request on one of its secure connectors.
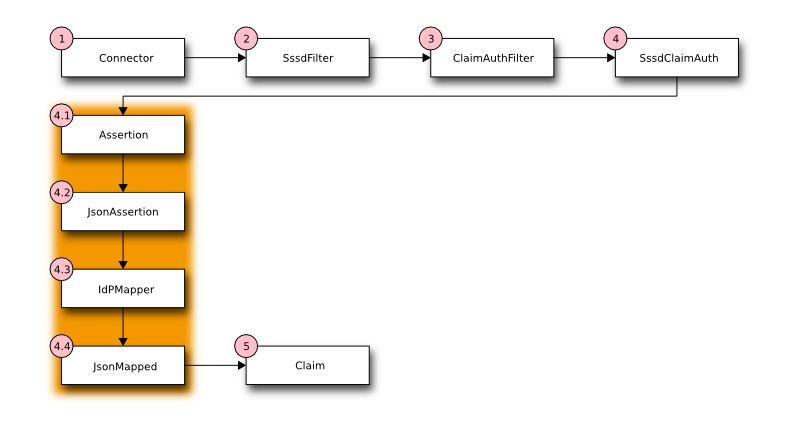
Figure 4.
| Step 1: | One or more Connectors have been configured to listen for requests being forwarded from a trusted Apache instance. The Connector is configured to communicate using either the HTTP or AJP protocols. See Exporting Environment Variables to the Proxy for more information on selecting a proxy transport protocol. |
|---|---|
| Step 2: | The identity metadata bound to the request needs to be extracted differently depending upon whether HTTP or AJP is the transport protocol. To allow later stages in the pipeline to be ignorant of the transport protocol semantics the SssdFilter servlet filter is introduced. The SssdFilter wraps the HttpServletRequest class and intercepts calls which might return the identity metadata. The wrapper in the filter looks in protocol specific locations for the metadata. In this manner users of the HttpServletRequest are isolated from protocol differences. |
| Step 3: | The ClaimAuthFilter is responsible for determining if identity metadata is bound to the request. If so all identity metadata is packaged into an assertion which is then handed off to SssdClaimAuth which will transform the identity metadata in the assertion into a AAA Claim which is the authorizing token for the user. |
| Step 4: | The SssdClaimAuth object is responsible for transforming the external federated identity metadata provided by Apache and SSSD into a AAA claim. The AAA claim is an authorization token which includes information about the user plus a set of roles. These roles provide the authorization to perform AAA tasks. Although how roles are assigned is flexible the expectation is domain and/or group membership will be the primary criteria for role assignment. Because deciding how to handle external federated identity metadata is site and deployment specific we need a loadable policy mechanism. This is accomplished by a set of transformation rules which transforms the incoming IdP identity metadata into a AAA claim. For greater clarity this important step is broken down into smaller units in the shaded box in Figure 4.. |
| Step 4.1: | The Mapping Rule Processor is designed to accept a JSON object (set of key/value pairs) as input and emit a different JSON object as output effectively operating as a transformation engine on key/value pairs. |
| Step 4.2: | The input assertion is rewritten as a JSON object in the format required by the Mapping Rule Processor. The JSON assertion is then passed into the Mapping Rule Processor. |
| Step 4.3: | The Mapping Rule Processor identified as IdPMapper evaluates the input JSON assertion in the context of the mapping rules defined for the site deployment. If IdPMapper is able to successfully transform the input it will return a JSON object which we called the mapped result. If the input JSON assertion is not compatible with the site specific rules loaded into the IdPMapper then NULL is returned by the IdPMapper. |
| Step 4.4: | If a mapped JSON object is returned by the IdPMapper the mapping was successful. The values in the mapped result are re-written into an AAA Claim token. |
How Apache Identity Metadata is Mapped to AAA Values
A federated IdP supplies metadata in a form unique to the IdP. This is called an assertion. That assertion must be transformed into a format and data understood by AAA. More importantly that assertion needs to yield authorization roles specific to AAA. In Figure 4. Step 4.3 the IdPMapper provides the transformation from an external IdP assertion to an AAA specific claim. It does this via a Mapping Rule Processor which reads a site specific set of transformation rules. These mapping rules define how to transform an external IdP assertion into a AAA claim. The mapping rules also are responsible for validating the external IdP claim to make sure it is consistent with the site specific requirements. The operation of the Mapping Rule Processor and the syntax of the mapping rules are defined in The Mapping Rule Processor.
Below is an example mapping rule which might be loaded into the Mapping Rule Processor. It is assumed there are two AAA roles which may be assigned [4]:
- user
- A role granting standard permissions for normal ODL users.
- admin
- A special role granting full administrative permissions.
In this example assigning the user and admin roles will be based on group membership in the following groups:
- odl_users
- Members of this group are normal ODL users with restricted permissions.
- odl_admin
- Members of this group are ODL administrators with permission to perform all operations.
Granting of the user and/or admin roles based on membership in the odl_users and odl_admin is illustrated in the follow mapping rule example which also extracts the user principal and domain information in the preferred format for the site (e.g. usernames are lowercase without domain suffixes and the domain is uppercase and supplied separately).
Mapping Rule Example 1.
1   [
2     {"mapping": {"ClientId": "$client_id",
3            "UserId": "$user_id",
4            "User": "$username",
5            "Domain": "$domain",
6            "roles": "$roles",
7           },
8      "statement_blocks": [
9        [
10         ["set", "$groups", []],
11         ["set", "$roles", []]
12       ],
13       [
14         ["in", "REMOTE_USER", "$assertion"],
15         ["exit", "rule_fails", "if_not_success"],
16         ["regexp", "$assertion[REMOTE_USER]", "(?<username>\\w+)@(?<domain>.+)"],
17         ["exit", "rule_fails", "if_not_success"],
18         ["lower", "$username", "$regexp_map[username]"],
19         ["upper", "$domain", "$regexp_map[domain]"],
20       ],
21       [
22         ["in", "REMOTE_GROUPS", "$assertion"],
23         ["exit", "rule_fails", "if_not_success"],
24         ["split", "$groups", "$assertion[REMOTE_GROUPS]", ":"],
25       ],
26       [
27         ["in", "odl_users", "$groups"],
28         ["continue", "if_not_success"],
29         ["append", "$roles", "user"],
30       ],
31       [
32         ["in", "odl_admin", "$groups"],
33         ["continue", "if_not_success"],
34         ["append", "$roles", "admin"]
35       ],
36       [
37         ["unique", "$roles", "$roles"],
38         ["length", "$n_roles", "$roles"],
39         ["compare", "$n_roles", ">", 0],
40         ["exit", "rule_fails", "if_not_success"],
41       ],
42     ]
43    }
44  ]
| Line 1: | Starts a list of rules. In this example only 1 rule is defined. Each rule is a JSON object containing a mapping and a required list of statement_blocks. The mapping may either be specified inside a rule as it is here or may be referenced by name in a table of mappings (this is easier to manage if you have a large number of rules and small number of mappings). |
|---|---|
| Lines 2-7: | Defines the JSON mapped result. Each key maps to AAA claim. The value is a rule variable whose value will be substituted if the rule succeeds. Thus for example the AAA claim value User will be assigned the value from the $username rule variable. |
| Line 8: | Begins the list of statement blocks. A statement must be contained inside a block. |
| Lines 9-12: | The first block usually initializes variables that will be referenced later. Here we initialize $groups and $roles to empty arrays. These arrays may be appended to in later blocks and may be referenced in the final mapping output. |
| Lines 13-20: | This block sets the user and domain information based on REMOTE_USER and exits the rule if REMOTE_USER is not defined. |
| Lines 14-15: | This test is critical, it assures REMOTE_USER is defined in the assertion, if not the rule is skipped because we depend on REMOTE_USER. |
| Lines 16-17: | Performs a regular expression match against REMOTE_USER to split the username from the domain. The regular expression uses named groups, in this instance username and domain. If the regular expression does not match the rule is skipped. |
| Lines 18-19: | These lines reference the previous result of the regular expression match which are stored in the special variable $regexp_map. The username is converted to lower case and stored in $username and the domain is converted to upper case and stored in $domain. The choice of case is purely by convention and site requirements. |
| Lines 21-35: | These 3 blocks assign roles based on group membership. |
| Lines 21-25: | Assures REMOTE_GROUPS is defined in the assertion; if not, the rule is skipped. REMOTE_GROUPS is colon separated list of group names. In order to operate on the individual group names appearing in REMOTE_GROUPS line 24 splits the string on the colon separator and stores the result in the $groups array. |
| Lines 27-30: | This block assigns the user role if the user is a member of the odl_users group. |
| Lines 31-35: | This block assigns the admin role if the user is a member of the odl_admin group. |
| Lines 36-41: | This block performs final clean up actions for the rule. First it assures there are no duplicates in the $roles array by calling the unique function. Then it gets a count of how many items are in the $roles array and tests to see if it's empty. If there are no roles assigned the rule is skipped. |
| Line 43: | This is the end of the rule. If we reach the end of the rule it succeeds. When a rule succeeds the mapping associated with the rule is looked up. Any rule variable appearing in the mapping is substituted with its value. |
Using the rules in Mapping Rule Example 1. and following example assertion in JSON format:
Assertion Example 1.
{
  "REMOTE_USER": "TestUser@example.com",
  "REMOTE_AUTH_TYPE": "Negotiate",
  "REMOTE_USER_GROUPS": "odl_users:odl_admin",
  "REMOTE_USER_EMAIL": "test.user@example.com",
  "REMOTE_USER_FIRSTNAME": "Test",
  "REMOTE_USER_LASTNAME": "User"
}
Then the mapper will return the following mapped JSON document. This is the mapping defined on line 2 of Mapping Rule Example 1. with the variables substituted after the rule successfully executed. Note any valid JSON data type can be returned, in this example the null value is returned for ClientId and UserId, normal strings for User and Domain and an array of strings for the roles value.
Mapped Result Example 1.
{
  "ClientId": null,
  "UserId": null,
  "User": "testuser",
  "Domain": "EXAMPLE.COM",
  "roles": ["user", "admin"]
}
The Mapping Rule Processor
The Mapping Rule Processor is designed to be as flexible and generic as possible. It accepts a JSON object as input and returns a JSON object as output. JSON was chosen because virtually all data can be represented in JSON, JSON has extensive support and JSON is human readable. The rules loaded into the Mapping Rule Processor are also expressed in JSON. One advantage of this is it makes it easy for a site administrator to define hardcoded values which are always returned and/or static tables of white and black listed users or users who are always mapped into certain roles.
Operation Model
The assertions from an IdP are stored in an associative array. A sequence of rules are applied, the first rule which returns success is considered a match. During the execution of each rule values from the assertion can be tested and transformed with the results selectively stored in variables local to the rule. If the rule succeeds an associative array of mapped values is returned. The mapped values are taken from the local variables set during the rule execution. The definition of the rules and mapped results are expressed in JSON notation.
A rule is somewhat akin to a function in a programming language. It starts execution with a set of predefined local variables. It executes statements which are grouped together in blocks. Execution continues until an exit statement returning a success/fail result is executed or until the last statement is reached which implies success. The remaining statements in a block may be skipped via a continue statement which tests a condition, this is equivalent to an "if" control flow of logic in a programming language.
Rule execution continues until a rule returns success. Each rule has a mapping associative array bound to it which is a template for the transformed result. Upon success the mapping template for the rule is loaded and the local variables from the successful rule are used to populate the values in the mapping template yielding the final mapped result.
If no rules returns success authentication fails.
Pseudo Code Illustrating Operational Model
mapped = null
foreach rule in rules {
    result = null
    initialize rule.variables with pre-defined values

    foreach block in rule.statement_blocks {
        for statement in block.statements {
            if statement.verb is exit {
                result = exit.status
                break
            }
            elif statement.verb is continue {
                break
            }
        }
        if result {
            break
        }
    if result == null {
        result = success
    }
if result == success {
    mapped = rule.mapping(rule.variables)
}
return mapped
Structure Of Rule Definitions
Rules are loaded by the rule processor via a JSON document called a rule definition. A definition has an optional set of mapping templates and a list of rules. Each rule has specifies a mapping template and has a list of statement blocks. Each statement block has a list of statements.
In pseudo-JSON (JSON does not have comments, the ... ellipsis is a place holder):
{
    "mappings": {
                    "template1": "{...}",
                    "template2": "{...}"
                },
    "rules": [
                 {   # Rule 0. A rule has a mapping or a mapping name
                     # and a list of statement blocks

                     "mapping": {...},
                     # -OR-
                     "mapping_name": "template1",

                     "statement_blocks": [
                                             [   # Block 0
                                                 [statement 0]
                                                 [statement 1]
                                             ],
                                             [   # Block 1
                                                 [statement 0]
                                                 [statement 1]
                                             ],

                                          ]
                 },
                 {   # Rule 1 ...
                 }
             ]

}
Mapping
A mapping template is used to produce the final associative array of name/value pairs. The template is a JSON Object. The value in a name/value pair can be a constant or a variable. If the template value is a variable the value of the variable is retrieved from the set of local variables bound to the rule thereby replacing it in the final result.
For example given this mapping template and rule variables in JSON:
template:
{
    "organization": "BigCorp.com",
    "user: "$subject",
    "roles": "$roles"
}
local variables:
{
    "subject": "Sally",
    "roles": ["user", "admin"]
}
The final mapped results would be:
{
    "organization": "BigCorp.com",
    "user: "Sally",
    "roles": ["user", "admin"]
}
Each rule must bind a mapping template to the rule. The mapping template may either be defined directly in the rule via the mapping key or referenced by name via the mapping_name key.
If the mapping_name is specified the mapping is looked up in a table of mapping templates bound to the Rule Processor. Using the name of a mapping template is useful when many rules generate the exact same template values.
If both mapping and mapping_name are defined the locally bound mapping takes precedence.
Syntax
The logic for a rule consists of a sequence of statements grouped in blocks. A statement is similar to a function call in a programming language.
A statement is a list of values the first of which is a verb which defines the operation the statement will perform. Think of the verbs as function names or operators. Following the verb are parameters which may be constants or variables. If the statement assigns a value to a variable left hand side of the assignment (lhs) is always the first parameter following the verb in the list of statement values.
For example this statement in JSON:
["split", "$groups", "$assertion[Groups]", ":"]
will assign an array to the variable $groups. It looks up the string named Groups in the assertion which is a colon (:) separated list of group names splitting that string on the colon character.
Statements must be grouped together in blocks. Therefore a rule is a sequence of blocks and block is a sequence of statements. The purpose of blocks is allow for crude flow of control logic. For example this JSON rule has 4 blocks.
[
    [
        ["set", $user, ""],
        ["set", $roles, []]
    ],
    [
        ["in", "UserName", "$assertion"],
        ["continue", "if_not_success"],
        ["set", "$user", "$assertion[UserName"],
    ],
    [
        ["in", "subject", "$assertion"],
        ["continue", "if_not_success"],
        ["set", "$user", "$assertion[subject]"],
    ],
    [
        ["length", "$temp", "$user"],
        ["compare", "$temp", ">", 0],
        ["exit", "rule_fails", "if_not_success"]
        ["append" "$roles", "unprivileged"]
    ]
]
The rule will succeed if either UserName or subject is defined in the assertion and if so the local variable $user will be set to the value found in the assertion and the "unprivileged" role will be appended to the roles array.
The first block performs initialization. The second block tests to see if the assertion has the key UserName if not execution continues at the next block otherwise the value of UserName in the assertion is copied into the variable $user. The third block performs a similar operation looking for a subject in the assertion. The fourth block checks to see if the $user variable is empty, if it is empty the rule fails because it didn't find either a UserName nor a subject in the assertion. If $user is not empty the "unprivileged" role is appended and the rule succeeds.
Data Types
There are 7 supported types which equate to the types available in JSON. At the time of this writing there are 2 implementations of this Mapping specification, one in Python and one in Java. This table illustrates how each data type is represented. The first two columns are definitions from an abstract specification. The JSON column enumerates the data type JSON supports. The Mapping column lists the 7 enumeration names used by the Mapping implemenation in each language. The following columns list the concrete data type used in that language.
| JSON | Mapping | Python | Java |
|---|---|---|---|
| object | MAP | dict | Map<String, Object> |
| array | ARRAY | list | List<Object> |
| string | STRING | unicode (Python 2) | String |
| str (Python 3) | |||
| number | INTEGER | int | Long |
| REAL | float | Double | |
| true | BOOLEAN | bool | Boolean |
| false | |||
| null | NULL | None | null |
Rule Debugging and Documentation
If the rule processor reports an error or if you're debugging your rules by enabling DEBUG log tracing then you must be able to correlate the reported statement to where it appears in your rule JSON source. A message will always identify a statement by the rule number, block number within that rule and the statement number within that block. However once your rules become moderately complex it will become increasingly difficult to identify a statement by counting rules, blocks and statements.
A better approach is to tag rules and blocks with a name or other identifying string. You can set the Reserved Variables rule_name and block_name to a string of your choice. These strings will be reported in all messages along with the rule, block and statement numbers.
JSON does not permit comments, as such you cannot include explanatory comments next to your rules, blocks and statements in the JSON source. The rule_name and block_name can serve a similar purpose. By putting assignments to these variables as the first statement in a block you'll both document your rules and be able to identify specific statements in log messages.
During rule execution the rule_name and block_name are initialized to the empty string at the beginning of each rule and block respectively.
The above example is augmented to include this information. The rule name is set in the first statement in the first block.
[
    [
        ["set", "$rule_name", "Must have UserName or subject"],
        ["set", "block_name", "Initialization"],
        ["set", $user, ""],
        ["set", $roles, []]
    ],
    [
        ["set", "block_name", "Test for UserName, set $user"],
        ["in", "UserName", "$assertion"],
        ["continue", "if_not_success"],
        ["set", "$user", "$assertion[UserName"],
    ],
    [
        ["set", "block_name", "Test for subject, set $user"],
        ["in", "subject", "$assertion"],
        ["continue", "if_not_success"],
        ["set", "$user", "$assertion[subject]"],
    ],
    [
        ["set", "block_name", "If not $user fail, else append unprivileged to roles"],
        ["length", "$temp", "$user"],
        ["compare", "$temp", ">", 0],
        ["exit", "rule_fails", "if_not_success"]
        ["append" "$roles", "unprivileged"]
    ]
]
Variables
Variables always begin with a dollar sign ($) and are followed by an identifier which is any alpha character followed by zero or more alphanumeric or underscore characters. The variable may optionally be delimited with braces ({}) to separate the variable from surrounding text. Three types of variables are supported:
- scalar
- array (indexed by zero based integer)
- associative array (indexed by string)
Both arrays and associative arrays use square brackets ([]) to specify a member of the array. Examples of variable usage:
$name
${name}
$groups[0]
${groups[0]}
$properties[key]
${properties[key]}
An array or an associative array may be referenced by it's base name (omitting the indexing brackets). For example the associative array array named "properties" is referenced using it's base name $properties but if you want to access a member of the "properties" associative array named "duration" you would do this $properties[duration]
This is not a general purpose language with full expression syntax. Only one level of variable lookup is supported. Therefore compound references like this
$properties[$groups[2]]
will not work.
Escaping
If you need to include a dollar sign in a string (where it is immediately followed by either an identifier or a brace and identifier) and do not want to have it be interpreted as representing a variable you must escape the dollar sign with a backslash, for example "$amount" is interpreted as the variable amount but "\$amount" is interpreted as the string "$amount" .
Reserved Variables
A rule has the following reserved variables:
- assertion
- The current assertion values from the federated IdP. It is a dictionary of key/value pairs.
- regexp_array
- The regular expression groups from the last successful regexp match indexed by number. Group 0 is the entire match. Groups 1..n are the corresponding parenthesized group counting from the left. For example regexp_array[1] is the first group.
- regexp_map
- The regular expression groups from the last successful regexp match indexed by group name.
- rule_number
- The zero based index of the currently executing rule.
- rule_name
- The name of the currently executing rule. If the rule name has not been set it will be the empty string.
- block_number
- The zero based index of the currently executing block within the currently executing rule.
- block_name
- The name of the currently executing block. If the block name has not been set it will be the empty string.
- statement_number
- The zero based index of the currently executing statement within the currently executing block.
Examples
Split a fully qualified username into user and realm components
It's common for some IdP's to return a fully qualified username (e.g. principal or subject). The fully qualified username is the concatenation of the user name, separator and realm name. A common separator is the @ character. In this example lets say the fully qualified username is bob@example.com and you want to return the user and realm as independent values in your mapped result. The username appears in the assertion as the value Principal.
Our strategy will be to use a regular expression identify the user and realm components and then assign them to local variables which will then populate the mapped result.
The mapping in JSON is:
{
    "user": "$username",
    "realm": "$domain"
}
The assertion in JSON is:
{
    "Principal": "bob@example.com"
}
Our rule is:
[
    [
        ["in", "Principal", "assertion"],
        ["exit", "rule_fails", "if_not_success"],
        ["regexp", "$assertion[Principal]", (?P<username>\\w+)@(?P<domain>.+)"],
        ["set", "$username", "$regexp_map[username]"],
        ["set", "$domain", "$regexp_map[domain]"],
        ["exit, "rule_succeeds", "always"]
    ]
]
Rule explanation:
Block 0:
- Test if the assertion contains a Principal value.
- Abort the rule if the assertion does not contain a Principal value.
- Apply a regular expression the the Principal value. Use named groupings for the username and domain components for clarity.
- Assign the regexp group username to the $username local variable.
- Assign the regexp group domain to the $domain local variable.
- Exit the rule, apply the mapping, return the mapped values. Note, an explicit exit is not required if there are no further statements in the rule, as is the case here.
The mapped result in JSON is:
{
    "user": "bob",
    "realm": "example.com"
}
Build a set of roles based on group membership
Often one wants to grant roles to a user based on their membership in certain groups. In this example let's say the assertion contains a Groups value which is a colon separated list of group names. Our strategy is to split the Groups assertion value into an array of group names. Then we'll test if a specific group is in the groups array, if it is we'll add a role. Finally if no roles have been mapped we fail. Users in the group "student" will get the role "unprivileged" and users in the group "helpdesk" will get the role "admin".
The mapping in JSON is:
{
    "roles": "$roles",
}
The assertion in JSON is:
{
    "Groups": "student:helpdesk"
}
Our rule is:
[
    [
        ["in", "Groups", "assertion"],
        ["exit", "rule_fails", "if_not_success"],
        ["set", "$roles", []],
        ["split", "$groups", "$assertion[Groups]", ":"],
    ],
    [
        ["in", "student", "$groups"],
        ["continue", "if_not_success"],
        ["append", "$roles", "unprivileged"]
    ],
    [
        ["in", "helpdesk", "$groups"],
        ["continue", "if_not_success"],
        ["append", "$roles", "admin"]
    ],
    [
        ["unique", "$roles", "$roles"],
        ["length", "$temp", "roles"],
        ["compare", $temp", ">", 0],
        ["exit", "rule_fails", "if_not_success"]
    ]

]
Rule explanation:
Block 0
- Test if the assertion contains a Groups value.
- Abort the rule if the assertion does not contain a Groups value.
- Initialize the $roles variable to an empty array.
- Split the colon separated list of group names into an array of individual group names
Block 1
- Test if "student" is in the $groups array
- Exit the block if it's not.
- Append "unprivileged" to the $roles array
Block 2
- Test if "helpdesk" is in the $groups array
- Exit the block if it's not.
- Append "admin" to the $roles array
Block 3
- Strip any duplicate roles that might have been appended to the $roles array to assure each role is unique.
- Count how many members are in the $roles array, assign the length to the $temp variable.
- Test to see if the $roles array had any members.
- Fail if no roles had been assigned.
The mapped result in JSON is:
{
    "roles": ["unprivileged", "admin"]
}
However, suppose whatever is receiving your mapped results is not expecting an array of roles. Instead it expects a comma separated list in a string. To accomplish this add the following statement as the last one in the final block:
["join", "$roles", "$roles", ","]
Then the mapped result will be:
{
    "roles": "unprivileged,admin"]
}
White list certain users and grant them specific roles
Suppose you have certain users you always want to unconditionally accept and authorize with specific roles. For example if the user is "head_of_IT" then assign her the "user" and "admin" roles. Otherwise keep processing. The list of white listed users is hard-coded into the rule.
The mapping in JSON is:
{
    "user": $user,
    "roles": "$roles",
}
The assertion in JSON is:
{
    "UserName": "head_of_IT"
}
Our rule in JSON is:
[
    [
        ["in", "UserName", "assertion"],
        ["exit", "rule_fails", "if_not_success"],
        ["in", "$assertion[UserName]", ["head_of_IT", "head_of_Engineering"]],
        ["continue", "if_not_success"],
        ["set", "$user", "$assertion[UserName"]
        ["set", "$roles", ["user", "admin"]],
        ["exit", "rule_succeeds", "always"]
    ],
    [
        ...
    ]
]
Rule explanation:
Block 0
- Test if the assertion contains a UserName value.
- Abort the rule if the assertion does not contain a UserName value.
- Test if the user is in the hardcoded list of white listed users.
- If the user isn't in the white listed array then exit the block and continue execution at the next block.
- Set the $user local variable to $assertion[UserName]
- Set the $roles local variable to the hardcoded array containing "user" and "admin"
- We're done, unconditionally exit and return the mapped result.
Block 1
- Further processing
The mapped result in JSON is:
{
    "user": "head_of_IT",
    "roles": ["users", "admin"]
}
Black list certain users
Suppose you have certain users you always want to unconditionally deny access to by placing them in a black list. In this example the user "BlackHat" will try to gain access. The black list includes the users "BlackHat" and "Spook".
The mapping in JSON is:
{
    "user": $user,
    "roles": "$roles",
}
The assertion in JSON is:
{
    "UserName": "BlackHat"
}
Our rule in JSON is:
[
    [
        ["in", "UserName", "assertion"],
        ["exit", "rule_fails", "if_not_success"],
        ["in", "$assertion[UserName]", ["BlackHat", "Spook"]],
        ["exit", "rule_fails", "if_success"]
    ],
    [
        ...
    ]
]
Rule explanation:
Block 0
- Test if the assertion contains a UserName value.
- Abort the rule if the assertion does not contain a UserName value.
- Test if the user is in the hard-coded list of black listed users.
- If the test succeeds then immediately abort and return failure.
Block 1
- Further processing
The mapped result in JSON is:
Null
Format Strings and/or Concatenate Strings
You can replace variables in a format string using the interpolate verb. String concatenation is trivially placing two variables adjacent to one another in a format string. Suppose you want to form an email address from the username and domain in an assertion.
The mapping in JSON is:
{
    "email": $email,
}
The assertion in JSON is:
{
    "UserName": "Bob",
    "Domain": "example.com"
}
Our rule in JSON is:
[
    [
        ["interpolate", "$email", "$assertion[UserName]@$assertion[Domain]"],
    ]
]
Rule explanation:
Block 0
- Replace the variable $assertion[UserName] with it's value and replace the variable $assertion[Domain] with it's value.
The mapped result in JSON is:
{
    "email": "Bob@example.com",
}
Note, sometimes it's necessary to utilize braces to separate variables from surrounding text by using the brace notation. This can also make the format string more readable. Using braces to delimit variables the above would be:
[
    [
        ["interpolate", "$email", "${assertion[UserName]}@${assertion[Domain]}"],
    ]
]
Make associative array lookups case insensitive
Many systems treat field names as case insensitive. By default associative array indexing is case sensitive. The solution is to lower case all the keys in an associative array and then only use lower case indices. Suppose you want the assertion associative array to be case insensitive.
The mapping in JSON is:
{
    "user": $user,
}
The assertion in JSON is:
{
    "UserName": "Bob"
}
Our rule in JSON is:
[
    [
        ["lower", "$assertion", "$assertion"],
        ["in", "username", "assertion"],
        ["exit", "rule_fails", "if_not_success"],
        ["set", "$user", "$assertion[username"]
    ]
]
Rule explanation:
Block 0
- Lower case all the keys in the assertion associative array.
- Test if the assertion contains a username value.
- Abort the rule if the assertion does not contain a username value.
- Assign the username value in the assertion to $user
The mapped result in JSON is:
{
    "user": "Bob",
}
Verbs
The following verbs are supported:
- set
- length
- interpolate
- append
- unique
- regexp
- regexp_replace
- split
- join
- lower
- upper
- compare
- in
- not_in
- exit
- continue
Some verbs have a side effects. A verb may set a boolean success/fail result which may then be tested with a subsequent verb. For example the fail verb can be used to indicate the rule fails if a prior result is either success or not_success. The regexp verb which performs a regular expression search on a string stores the regular expression sub-matches as a side effect in the variables $regexp_array and $regexp_map.
Verb Definitions
set
set $variable value
- $variable
- The variable being assigned (i.e. lhs)
- value
- The value to assign to the variable (i.e. rhs). The value may be another variable or a constant.
set assigns a value to a variable, in other words it's an assignment statement.
Examples:
Initialize a variable to an empty array.
["set", "$groups", []]
Initialize a variable to an empty associative array.
["set", "$groups", {}]
Assign a string.
["set", "$version", "1.2.3"]
Copy the UserName value from the assertion to a temporary variable.
["set", "$temp", "$assertion[UserName]"],
Get the 2nd item in an array (array indexing is zero based)
["set", "$group", "$groups[1]"]
Set the associative array entry "IdP" to "kdc.example.com".
["set", "$metadata[IdP]", "kdc.example.com""]
length
length $variable value
- $variable
- The variable which receives the length value
- value
- The value whose length is to be determined. May be one of array, associative array, or string.
length computes the number of items in the value. How this is done depends upon the type of value:
- array
- The length is the number of items in the array.
- associative array
- The length is the number of key/value pairs in the associative array.
- string
- The length is the number of characters (not octets) in the string.
Examples:
Count how many items are in the $groups array and assign that value to the $groups_length variable.
["length", "$groups_length", "$groups"]
Count how many key/value pairs are in the $assertion associative array and assign that value to the $num_assertion_values variable.
["length", "$num_assertion_values", "$assertion"]
Count how many characters are in the assertion's UserName and assign the value to $username_length.
["length", "$user_name_length", "$assertion[UserName]"]
interpolate
interpolate $variable string
- $variable
- This variable is assigned the result of the interpolation.
- string
- A string containing references to variables which will be replaced in the string.
interpolate replaces each occurrence of a variable in a string with it's value. The result is assigned to $variable.
Examples:
Form an email address given the username and domain. If the username is "jane" and the domain is "example.com" then $email will be "jane@example.com"
["interpolate", "$email", "${username}@${domain}"]
append
append $variable value
- $variable
- This variable must be an array. It is modified in place by appending value to the end of the array.
- value
- The value to append to the end of the array.
append adds a value to end of an array.
unique
unique $variable value
- $variable
- This variable is assigned the unique values in the value array.
- value
- An array of values. must be an array.
unique builds an array of unique values in value by stripping out duplicates and assigns the array of unique values to $variable. The order of items in the value array are preserved.
regexp
regexp string pattern
- string
- The string the regular expression pattern is applied to.
- pattern
- The regular expression pattern.
regexp performs a regular expression match against string. The regular expression pattern syntax is defined by the regular expression implementation of the language this API is written in.
Pattern groups are a convenient way to select sub-matches. Pattern groups may accessed by either group number or group name. After a successful regular expression match the groups are stored in the special variables $regexp_array and $regexp_map.
$regexp_array is used to access the groups by numerical index. Groups are numbered by counting the left parenthesis group delimiter starting at 1. Group 0 is the entire match. $regexp_array is valid irregardless of whether you used named groups or not.
$regexp_map is used to access the groups by name. $regexp_map is only valid if you used named groups in the pattern.
Examples:
Many user names are of the form "user@domain", to split the username from the domain and to be able to work with those values independently use a regular expression and then assign the results to a variable. In this example there are two regular expression groups, the first group is the username and the second group is the domain. In the first example we use named groups and then access the match information in the special variable $regexp_map via the name of the group.
["regexp", "$assertion[UserName]", "(?P<username>\\w+)@(?P<domain>.+)"],
["continue", "if_not_success"],
["set", "$username", "$regexp_map[username]"],
["set", "$domain", "$regexp_map[domain]"],
This is exactly equivalent but uses numbered groups instead of named groups. In this instance the group matches are stored in the special variable $regexp_array and accessed by numerical index.
["regexp", "$assertion[UserName]", "(\\w+)@(.+)"],
["continue", "if_not_success"],
["set", "$username", "$regexp_array[1]"],
["set", "$domain", "$regexp_array[2]"],
regexp_replace
regexp_replace $variable string pattern replacement
- $variable
- The variable which receives result of the replacement.
- string
- The string to perform the replacement on.
- pattern
- The regular expression pattern.
- replacement
- The replacement specification.
regexp_replace replaces each occurrence of pattern in $string with replacement. See regexp for details of using regular expressions.
split
split $variable string pattern
- $variable
- This variable is assigned an array containing the split items.
- string
- The string to split into separate items.
- pattern
- The regular expression pattern used to split the string.
split splits string into separate pieces and assigns the result to $variable as an array of pieces. The split occurs wherever the regular expression pattern occurs in string. See regexp for details of using regular expressions.
Examples:
Split a list of groups separated by a colon (:) into an array of individual group names. If $assertion[Groups] contained the string "user:admin" then $group_list will set to ["user", "admin"].
["split", "$group_list", "$assertion[Groups]", ":"]
join
join $variable array join_string
- $variable
- This variable is assigned the string result of the join operation.
- array
- An array of string items to be joined together with $join_string.
- join_string
- The string inserted between each element in array.
join accepts an array of strings and produces a single string where each element in the array is separated by join_string.
Examples:
Convert a list of group names into a single string where each group name is separated by a colon (:). If the array $group_list is ["user", "admin"] and the join_string is ":" then the $group_string variable will be set to "user:admin".
["join", "$group_string", "$groups", ":"]
lower
lower $variable value
- $variable
- This variable is assigned the result of the lower operation.
- value
- The value to lower case, may be either a string, array, or associative array.
lower lower cases the input value. The input value may be one of the following types:
- string
- The string is lower cased.
- array
- Each member of the array must be a string, the result is an array with the items replaced by their lower case value.
- associative array
- Each key in the associative array is lower cased. The values associated with the key are not modified.
Examples:
Lookup UserName in the assertion and set the variable $username to it's lower case value.
["lower", "$username", "$assertion[UserName]"],
Set each member of the $groups array to it's lower case value. If $groups was ["User", "Admin"] then $groups will become ["user", "admin"].
["lower", "$groups", "$groups"],
To enable case insensitive lookup's in an associative array lower case each key in the associative array. If $assertion was {"UserName": "JoeUser"} then $assertion will become {"username": "JoeUser"}
["lower", "$assertion", $assertion"]
upper
upper $variable value
- $variable
- This variable is assigned the result of the upper operation.
- value
- The value to upper case, may be either a string, array, or associative array.
upper is exactly analogous to lower except the values are upper cased, see lower for details.
in
in member collection
- member
- The value whose membership is being tested.
- collection
- A collection of members. May be string, array or associative array.
in tests to see if member is a member of collection. The membership test depends on the type of collection, the following are supported:
- array
- If any item in the array is equal to member then the result is success.
- associative array
- If the associative array contains a key equal to member then the result is success.
- string
- If the string contains a sub-string equal to member then the result is success.
Examples:
Test to see if the assertion contains a UserName value.
["in", "UserName", "$assertion"]
["continue", "if_not_success"]
Test to see if a group is one of "user" or "admin".
["in", "$group", ["user", "admin"]]
["continue", "if_not_success"]
Test to see if the sub-string "BigCorp" is in the assertion's Provider value.
["in", "BigCorp", "$assertion[Provider]"]
["continue", "if_not_success"]
not_in
in member collection
- member
- The value whose membership is being tested.
- collection
- A collection of members. May be string, array or associative array.
not_in is exactly analogous to in except the sense of the test is reversed. See in for details.
compare
compare left operator right
- left
- The left hand value of the binary operator.
- operator
- The binary operator used for comparing left to right.
- right
- The right hand value of the binary operator.
compare compares the left value to the right value according the operator and sets success if the comparison evaluates to True. The following relational operators are supported.
| Operator | Description |
|---|---|
| == | equal |
| != | not equal |
| < | less than |
| <= | less than or equal |
| > | greater than |
| >= | greater than or equal |
The left and right hand sides of the comparison operator must be the same type, no type conversions are performed. Not all combinations of operator and type are supported. The table below illustrates the supported combinations. Essentially you can test for equality or inequality on any type. But only strings and numbers support the magnitude relational operators.
| Operator | STRING | INTEGER | REAL | BOOLEAN | MAP | LIST | NULL |
|---|---|---|---|---|---|---|---|
| == | X | X | X | X | X | X | X |
| != | X | X | X | X | X | X | X |
| < | X | X | X | ||||
| <= | X | X | X | ||||
| > | X | X | X | ||||
| >= | X | X | X |
Examples:
Test to see if the $groups array has at least 2 members
["length", "$group_length", "$groups"],
["compare", "$group_length", ">=", 2]
exit
exit status criteria
- status
- The result for the rule.
- criteria
- The criteria upon which will cause the rule will be immediately exited with a failed status.
exit causes the rule being executed to immediately exit and a rule result if the specified criteria is met. Statement verbs such as in or compare set the result status which may be tested with the success and not_success criteria.
The exit status may be one of:
- rule_fails
- The rule has failed and no mapping will occur.
- rule_succeeds
- The rule succeeded and the mapping will be applied.
The criteria may be one of:
- if_success
- If current result status is success then exit with status.
- if_not_success
- If current result status is not success then exit with status.
- always
- Unconditionally exit with status.
- never
- Effectively a no-op. Useful for debugging.
Examples:
The rule requires UserName to be in the assertion.
["in", "UserName", "$assertion"]
["exit", "rule_fails", "if_not_success"]
continue
continue criteria
- criteria
- The criteria which causes the remainder of the block to be skipped.
continue is used to control execution for statement blocks. It mirrors in a crude way the if expression in a procedural language. continue does not affect the success or failure of a rule, rather it controls whether subsequent statements in a block are executed or not. Control continues at the next statement block.
Statement verbs such as in or compare set the result status which may be tested with the success and not_success criteria.
The criteria may be one of:
- if_success
- If current result status is success then exit the statement block and continue execution at the next statement block.
- if_not_success
- If current result status is not success then exit the statement block and continue execution at the next statement block.
- always
- Immediately exit the statement block and continue execution at the next statement block.
- never
- Effectively a no-op. Useful for debugging. Execution continues at the next statement.
Examples:
The following pseudo code:
roles = [];
if ("Groups" in assertion) {
    groups = assertion["Groups"].split(":");
    if ("qa_test" in groups) {
        roles.append("tester");
    }
}
could be implemented this way:
[
    ["set", "$roles", []],
    ["in", "Groups", "$assertion"],
    ["continue", "if_not_success"],
    ["split" "$groups", $assertion[Groups]", ":"],
    ["in", "qa_test", "$groups"],
    ["continue", "if_not_success"],
    ["append", "$roles", "tester"]
]
Security Considerations
Attack Vectors
A Java EE Container fronted by Apache has by definition 2 major components:
- Apache
- Java EE Container
Each of these needs to be secure in its own right. There is extensive documentation on securing each of these components and the reader is encouraged to review this material. For the purpose of this discussion we are most interested in how Apache and the Java EE Container cooperate to form an integrated security system. Because Apache is performing authentication on behalf of the Java EE Container, it views Apache as a trusted partner. Our primary concern is the communication channel between Apache and the Java EE Container. We must assure the Java EE Container knows who it's trusted partner is and that it only accepts security sensitive data from that partner, this can best be described as The Proxy Problem.
Forged REMOTE_USER
HTTP request handling is often implemented as a processing pipeline where individual handlers are passed the request, they may then attach additional metadata to the request or transform it in some manner before handing it off to the next stage in the pipeline. A request handler may also short circuit the request processing pipeline and cause a response to be generated. Authentication is typically implemented an as early stage request handler. If a request gets past an authentication handler later stage handlers can safely assume the request belongs to an authenticated user. Authorization metadata may also have been attached to the request. Later stage handlers use the authentication/authorization metadata to make decisions as to whether the operations in the request can be satisfied.
When a request is fielded by a traditional web server with CGI (Common Gateway Interface, RFC 3875) the request metadata is passed via CGI meta-variables. CGI meta-variables are often implemented as environment variables, but in practical terms CGI metadata is really just a set of name/value pairs a later stage (i.e. CGI script, servlet, etc.) can reference to learn information about the request.
The CGI meta-variables REMOTE_USER and AUTH_TYPE relate to authentication. REMOTE_USER is the identity of the authenticated user and AUTH_TYPE is the authentication mechanism that was used to authenticate the user.
If a later stage request handler sees REMOTE_USER and AUTH_TYPE as non-null values it assumes the user is fully authenticated! Therefore is it essential REMOTE_USER and AUTH_TYPE can only enter the request pipeline via a trusted source.
The Proxy Problem
In a traditional monolithic web server the CGI meta-variables are created and managed by the web server, which then passes them to CGI scripts and executables in a very controlled environment where they execute in the context of the web server. Forgery of CGI meta-variables is generally not possible unless the web server has been compromised in some fashion.
However in our configuration the Apache web server acts as an identity processor, which then forwards (i.e. proxies) the request to the Java EE container (i.e Tomcat, Jetty, etc.). One could think of the Java EE container as just another CGI script which receives CGI meta-variables provided by the Apache web server. Where this analogy breaks down is how Apache invokes the CGI script. Instead of forking a child process where the child's environment and input/output pipes are carefully controlled by Apache the request along with its additional metadata is forwarded over a transport (typically TCP/IP) to another process, the proxy, which listens on socket.
The proxy (in this case the Java EE container) reads the request and the attached metadata and acts upon it. If the request read by the proxy contains the REMOTE_USER and AUTH_TYPE CGI meta-variables the proxy will consider the request fully authenticated!. Therefore when the Java EE container is configured as a proxy it is essential it only reads requests from a trusted Apache web server. If any other client aside from the trusted Apache web server is permitted to connect to the Java EE container that client could present forged REMOTE_USER and AUTH_TYPE meta-variables, which would be automatically accepted as valid thus opening a huge security hole.
Possible Approaches to Lock Down a Proxy Channel
Tomcat Valves
You can use a Tomcat Remote Address Valve valve to filter by IP or hostname to only allow a subset of machines to connect. This can be configured at the Engine, Host, or Context level in the conf/server.xml by adding something like the following:
<!-- allow only LAN IPs to connect -->
<Valve className="org.apache.catalina.valves.RemoteAddrValve"
 allow="192.168.1.*">
</Valve>
The problem with valves is they are a Tomcat only concept, the RemoteAddrValve only checks addresses, not port numbers (although it should be easy to add port checking) and they don't offer anything better than what is described in Locking Down the Apache to Java EE Container Channel, which is not container specific. Servlet filters are always available regardless of the container the servlet is running in. A filter can check both the address and port number and refuse to operate on the request if the address and port are not known to be a trusted authentication proxy. Also note that if the Java EE Container is configured to accept connections other than from the trusted HTTP proxy server (a very likely scenario) then filtering at the connector level is not sufficient because a servlet which trusts REMOTE_USER must be assured the request arrived only on a trusted HTTP proxy server connection, not one of the other possible connections.
SSL/TLS with client auth
SSL with client authentication is the ultimate way to lock down a HTTP Server to Java EE Container proxy connection. SSL with client authentication provides authenticity, integrity, and confidentiality. However those desirable attributes come at a performance cost which may be excessive. Unless a persistent TCP connection is established between the HTTP server and the Java EE Container a SSL handshake will need to occur on each request being proxied, SSL handshakes are expensive. Given that the HTTP server and the Java EE Container will likely be deployed on the same compute node (or at a minimum on a secure subnet) the advantage of SSL for proxy connections may not be warranted because other options are available for these configuration scenarios; see Locking Down the Apache to Java EE Container Channel. Also note that if the Java EE Container is configured to accept connections other than from the trusted HTTP proxy server (a very likely scenario), then filtering at the connector level is not sufficient because a servlet which trusts REMOTE_USER must be assured that the request arrived only on a trusted HTTP proxy server connection, not one of the other possible connections.
Java Security Manager Permissions
The Java Security Manager allows you define permissions which are checked at run time before code executes. java.net.SocketPermission and java.net.NetPermission would appear to offer solutions for restricting which host and port a request containing REMOTE_USER will be trusted. However security permissions are applied after a request is accepted by a connector. They are also more geared towards what connections code can subsequently utilize as opposed to what connection a request was presented on. Therefore security manager permissions seem to offer little value for our purpose. One can simply test to see which host sent the proxy request and on what port it arrived on by looking at the connection information in the request. Restricting which proxies can submit trusted requests is better handled at the level of the connector, which unfortunately is a container implementation issue. Tomcat and Jetty have different ways of handling connector specifications.
AJP requiredSecret
The AJP protocol includes an attribute called requiredSecret, which can be used to secure the connection between AJP endpoints. When an HTTP server sends an AJP proxy request to a Java EE Container it embeds in the protocol transmission a string (requiredSecret) known only to the HTTP server and the Java EE Container. The AJP connector on the Java EE Container is configured with the requiredSecret value and will reject as unauthorized any AJP requests whose requiredSecret does not match.
There are two problems with requiredSecret`. First of all it's not particularly secure. In fact, it's fundamentally no different than sending a cleartext password. If the AJP request is not encrypted it means the requiredSecret will be sent in the clear which is probably one of the most egregious security mistakes. If the AJP request is transmitted in a manner where the traffic can be sniffed, it would be trivial to recover the requiredSecret and forge a request with it. On the other hand encrypting the communication channel between the HTTP server and the Java EE Container means using SSL which is fairly heavyweight. But more to the point, if one is using SSL to encrypt the channel there is a far better mechanism to ensure the HTTP server is who it claims to be than embedding requiredSecret. If one is using SSL you might as well use SSL client authentication where the HTTP identifies itself via a client certificate. SSL client authentication is a very robust authentication mechanism. But doing SSL client authentication, or for that matter just SSL encryption, for every AJP protocol request is prohibitively expensive from a performance standpoint.
The second problem with requiredSecret is that despite being documented in a number of places it's not actually implemented in Apache mod_proxy_ajp. This is detailed in bug 53098. You can set requiredSecret in the mod_proxy_ajp configuration, but it won't be included in the wire protocol. There is a patch to implement requiredSecret but, it hasn't made it into any shipping version of Apache yet. But even if requiredSecret was implemented it's not useful. Also one could construct the equivalent of requiredSecret from other AJP attributes and/or an HTTP extension header but those would suffer from the same security issues requiredSecret has, therefore it's mostly pointless.
Java EE Container Issues
Jetty Issues
Jetty is a Java EE Container which can be used as alternative to Tomcat. Jetty is an Eclipse project. Recent versions of Jetty have dropped support for AJP; this is described in the Jetty AJP Configuration Guide which states:
Configuring AJP13 Using mod_jk or mod_proxy_ajp. Support for this feature has been dropped with Jetty 9. If you feel this should be brought back please file a bug.
Eclipse Bug 387928 Retire jetty-ajp was opened to track the removal of AJP in Jetty and is now closed.
Tomcat Issues
You should refer the Tomcat Security How-To for a full discussion of Tomcat security issues.
The tomcatAuthentication attribute is used with the AJP connectors to determine if Tomcat should authenticate the user or if authentication can be delegated to the reverse proxy that will then pass the authenticated username to Tomcat as part of the AJP protocol.
The requiredSecret attribute in AJP connectors configures a shared secret between Tomcat and the reverse proxy in front of Tomcat. It is used to prevent unauthorized connections over AJP protocol.
Locking Down the Apache to Java EE Container Channel
The recommended approach to lock down the proxy channel is:
- Run both Apache and the servlet container on the same host.
- Configure Apache to forward the proxy request on the loopback interface (e.g. 127.0.0.1 also known as localhost). This prohibits any external IP address from connecting, only processes running on the locked down host can communicate over localhost.
- Reserve one or more ports for communication exclusively for proxy communication between Apache and the servlet container. The servlet container may listen on other ports for non-critical non-authenticated requests.
- The ClaimAuthFilter that reads the identity metadata must assure that requests have arrived only on a trusted port. To achieve this the FederationConfiguration defines the secureProxyPorts configuration option. secureProxyPorts is a space delimited list of ports which during deployment the administrator has configured such that they are exclusively dedicated for use by the Apache server(s) providing authentication and identity information. These ports are set in the servlet container's Connector declarations. See Declaring the Connector Ports for Authentication Proxies for more information).
- When the ClaimAuthFilter receives a request, the first thing it does is check the ServletRequest.getLocalPort() value and verifies it is a member of the secureProxyPorts configuration option. If the port is a member of secureProxyPorts, it will trust every identity assertion found in the request. If the local port is not a member of secureProxyPorts, a HTTP 401 (unauthorized) error status will be returned for the request. A warning message will be logged the first time this occurs.
Declaring the Connector Ports for Authentication Proxies
As described in The Proxy Problem the AAA authentication system must confirm the request it is processing originated from a trusted HTTP proxy server. This is accomplished with port isolation.
The administrator deploying a federated AAA solution with SSSD identity lookups must declare in the AAA federation configuration which ports the proxy requests from the trusted HTTP server will arrive on by setting the secureProxyPorts configuration item. These ports must only be used for the trusted HTTP proxy server. The AAA federation software will not perform authentication for any request arriving on a port other than those listed in secureProxyPorts.
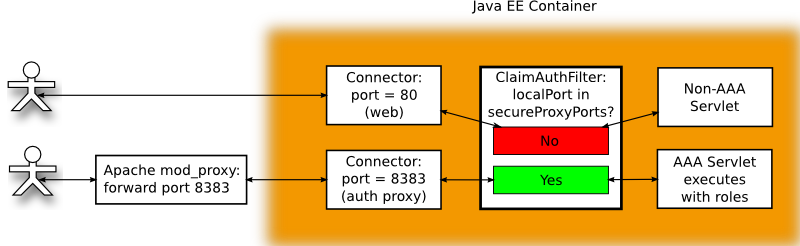
Figure 5.
secureProxyPorts configuration option is set either in the federation.cfg file or in the org.opendaylight.aaa.federation.secureProxyPorts bundle configuration. secureProxyPorts is a space-delimited list of port numbers on which a trusted HTTP proxy performing authentication forwards pre-authenticated requests. For example:
secureProxyPorts=8383
Means a request which arrived on port 8383 is from a trusted HTTP proxy server and the value of REMOTE_USER and other authentication metadata in request can be trusted.
Appendix
CGI Export Issues
Apache processes requests as a series of steps in a pipeline fashion. The ordering of these steps is important. Core Apache is fairly minimal, most of Apache's features are supplied by loadable modules. When a module is loaded it registers a set of hooks (function pointers) which are to be run at specific stages in the Apache request processing pipeline. Thus a module can execute code at any of a number of stages in the request pipeline.
The user metadata supplied by Apache is initialized in two distinct parts of Apache.
- an authentication module (e.g. mod_auth_kerb)
- the mod_lookup_identity module.
After successful authentication the authentication module will set the name of the user principal and the mechanism used for authentication in the request structure.
- request->user
- request->ap_auth_type
Authentication hooks run early in the request pipeline for the obvious reason a request should not be processed if not authenticated. The specific authentication module that runs is defined by Location directive in the Apache configuration which binds specific authentication to specific URL's. The mod_lookup_identity module must run after authentication module runs because it depends on knowing who the authenticated principal is so it can lookup the data on that principal.
When reading mod_lookup_identity documentation one often sees references to the REMOTE_USER CGI environment variable with the implication REMOTE_USER is how one accesses the name of the authenticated principal. This is a bit misleading, REMOTE_USER is a CGI environment variable. CGI environment variables are only set by Apache when it believes the request is going to be processed by a CGI implementation. In this case REMOTE_USER is initialized from the request->user value.
How is the authenticated principal actually forwarded to our proxy?
If we are using the AJP proxy protocol the mod_proxy_ajp module when preparing the proxy request will read the value of request->user and insert it into the SC_A_REMOTE_USER AJP attribute. On the receiving end SC_A_REMOTE_USER will be extracted from the AJP request and used to populate the value returned by``HttpServletRequest.getRemoteUser()``. The exchange of the authenticated principal when using AJP is transparent to both the sender and receiver, nothing special needs to be done. See Transporting Identity Metadata from Apache to a Java EE Servlet for details on how metadata can be exchanged with the proxy.
However, if AJP is not being used to proxy the request the authenticated principal must be passed through some other mechanism, an HTTP extension header is the obvious solution. The Apache mod_headers module can be used to add HTTP request headers to the proxy request, for example:
RequestHeader set MY_HEADER MY_VALUE
Where does the value MY_VALUE come from? It can be hardcoded into the RequestHeader statement or it can reference an existing environment variable like this:
RequestHeader set MY_HEADER %{FOOBAR}e
where the notation %{FOOBAR}e is the contents of the environment variable FOOBAR. Thus we might expect we could do this:
RequestHeader set REMOTE_USER %{REMOTE_USER}e
The conundrum is the presumption the REMOTE_USER environment variable has already been set at the time mod_headers executes the RequestHeader statement. Unfortunately this often is not the case.
The Apache environment variables REMOTE_USER and AUTH_TYPE are set by the Apache function ap_add_common_vars() defined in server/util_script.c. ap_add_common_vars() and is called by the following modules:
- mod_authnz_fcgi
- mod_proxy_fcgi
- mod_proxy_scgi
- mod_isapi
- mod_ext_filter
- mod_include
- mod_cgi
- mod_cgid
Apache variables
Apache modules provide access to variables which can be referenced by configuration directives. Unfortunately there isn't a lot of uniformity to what the variables are and how they're referenced; it mostly depends on how a given Apache module was implemented. As you might imagine a bit of inconsistent historical cruft has accumulated over the years, it can be confusing. The Apache Foundation is trying to clean some of this up bringing uniformity to modules by utilizing the common expr (expression) module ap_expr. The idea being modules will forgo their home grown expression syntax with its numerous quirks and instead expose the common expr language. However this is a work in progress and at the time of this writing only a few modules have acquired expr expression support.
Among the existing Apache modules there currently are three different sets of variables.
- Server variables.
- Environment variables.
- SSL variables.
Server variables (item 1) are names given to internal values. The set of names for server variables and what they map to are defined by the module implementing the server variable lookup. For example mod_rewrite has its own variable lookup implementation.
Environment variables (item 2) are variables exported to a subprocess. Internally they are stored in request->subprocess_env. The most common use of environment variables exported to a subprocess are the CGI variables.
SSL variables are connection specific values describing the SSL connection. The lookup is implemented by ssl_var_lookup(), which given a variable name looks in a variety of internal data structures to find the matching value.
The important thing to remember is server variables != environment variables. This can be confusing because they often share the same name. For example, there is the server variable REMOTE_USER and there is the environment variable REMOTE_USER. The environment variable REMOTE_USER only exists if some module has called ap_add_common_vars(). To complicate matters, some modules allow you to access server variables, other modules allow you to access environment variables and some modules provide access to both server variables and environment variables.
Coming back to our goal of setting an HTTP extension header to the value of REMOTE_USER, we observe that mod_headers provides the needed RequestHeader operation to set a HTTP header in the request. Looking at the documentation for RequestHeader we see a value can be specified with one of the following lookups:
- %{VARNAME}e
- The contents of the environment variable VARNAME.
- %{VARNAME}s
- The contents of the SSL environment variable VARNAME, if mod_ssl is enabled.
But wait! This only gives us access to environment variables and the REMOTE_USER environment variable is only set if ap_add_common_vars() is called by a module after an authentication module runs! ap_add_common_vars() is usually only invoked if the request is going to be passed to a CGI script. But we're not doing CGI; instead we're proxying the request. The likelihood the REMOTE_USER environment variable will be set is quite low. See Setting the REMOTE_USER environment variable.
mod_headers is the only way to set a HTTP extension header and mod_headers only gives you access to environment variables and the REMOTE_USER environment variable is not set. Therefore if we're not using AJP and must depend on setting a HTTP extension header for REMOTE_USER, we have a serious problem.
But there is a solution; you can either try the machinations described in Setting the REMOTE_USER environment variable or assure you're running at least Apache version 2.4.10. In Apache 2.4.10 the mod_headers module added support for ap_expr. ap_expr provides access to server variables by using the %{VARIABLE} notation. ap_expr also can lookup subprocess environment variables and operating system environment variables using its reqenv() and osenv() functions respectively.
Thus the simple solution for exporting the REMOTE_USER HTTP extension header if you're running Apache 2.4.10 or later is:
RequestHeader set X-SSSD-REMOTE_USER expr=%{REMOTE_USER}
The expr=%{REMOTE_USER} in the above statement says pass %{REMOTE_USER} as an expression to ap_expr, evaluate the expression and return the value. In this case the expression %{REMOTE_USER} is very simple, just the value of the server variables REMOTE_USER. Because RequestHeader runs after authentication request->user will have been set.
Setting the REMOTE_USER environment variable
If you do a web search on how to export REMOTE_USER in a HTTP extension header for a proxy you will discover this is a common problem that has frustrated a lot of people [2]. The usual advice seems to be to use mod_rewrite with a look-ahead. In fact this is even documented in the mod_rewrite documentation for REMOTE_USER which says:
%{LA-U:variable} can be used for look-aheads which perform an internal (URL-based) sub-request to determine the final value of variable. This can be used to access variable for rewriting which is not available at the current stage, but will be set in a later phase.
For instance, to rewrite according to the REMOTE_USER variable from within the per-server context (httpd.conf file) you must use %{LA-U:REMOTE_USER} - this variable is set by the authorization phases, which come after the URL translation phase (during which mod_rewrite operates).
One suggested solution is this:
RewriteCond %{LA-U:REMOTE_USER} (.+)
RewriteRule .* - [E=RU:%1]
RequestHeader set X_REMOTE_USER %{RU}e
- The RewriteCond with the %{LA-U:} construct performs an internal redirect to obtain the value of REMOTE_USER server variable, if that value is non-empty because the (.+) regular expression matched the rewrite condition succeeds and the following RewriteRule executes.
- The RewriteRule executes, the first parameter is a pattern, the second parameter is the replacement which can be followed by optional flags inside brackets. The .* pattern is a regular expression that matches anything, the - replacement is a special value which indicates no replacement is to be performed. In other words the pattern and replacement are no-ops and the RewriteRule is just being used for it's side effect defined in the flags. The E=NAME:VALUE notation says set the NAME environment variable to VALUE. In this case the environment variable is RU and the value is %1. The documentation for RewriteRule tells us that %N are back-references to the last matched RewriteCond pattern, in this case it's the value of REMOTE_USER.
- Finally RequestHeader sets the request header X_REMOTE_USER to the value of the RU environment variable.
Another suggested solution is this:
RewriteRule .* - [E=REMOTE_USER:%{LA-U:REMOTE_USER}]
The Problem with mod_rewrite lookahead
I do not recommend using mod_rewrite's lookahead to gain access to authentication data values. Although the above suggestions will work to get access to REMOTE_USER it is extremely inefficient because it causes Apache to reprocess the request with an internal redirect. The documentation suggests a lookahead reference will cause one internal redirect. However from examining Apache debug logs the mod_rewite lookahead caused mod_lookup_identity to be invoked 11 times while handling one request. If the mod_rewrite lookahead is removed and another technique is used to get access to REMOTE_USER then mod_lookup_identity is invoked exactly once as expected.
But it's not just REMOTE_USER which we need access to, we also need to reference AUTH_TYPE which has the identical issues associated with REMOTE_USER. If an equivalent mod_rewrite block is added to the configuration for AUTH_TYPE so that both REMOTE_USER and auth_type are resolved using a lookahead Apache appears to go into an infinite loop and the request stalls.
I tried to debug what was occurring when Apache was configured this way and why it seemed to be executing the same code over and over but I was not able to figure it out. My conclusion is using mod_rewrite lookahead's is not a viable solution! Other web posts also make reference to the inefficiency but they seem to be unaware of just how bad it is.
| [1] | (1, 2, 3) Tomcat has a bug/feature, not all attributes are enumerated by getAttributeNames() therefore getAttributeNames() cannot be used to obtain the full set of attributes. However if you know the name of the attribute a priori you can call getAttribute() and obtain the value. Therefore we maintain a list of attribute names (httpAttributes) which will be used to call getAttribute() with so we don't miss essential attributes. This is the Tomcat bug, note it is marked WONTFIX. Bug 25363 - request.getAttributeNames() not working properly Status: RESOLVED WONTFIX https://issues.apache.org/bugzilla/show_bug.cgi?id=25363 The solution adopted by Tomcat is to document the behavior in the "The Apache Tomcat Connector - Reference Guide" under the JkEnvVar property where is says: You can retrieve the variables on Tomcat as request attributes via request.getAttribute(attributeName). Note that the variables send via JkEnvVar will not be listed in request.getAttributeNames(). |
| [2] | Some examples of posts concerning the export of REMOTE_USER include: http://www.jaddog.org/2010/03/22/how-to-proxy-pass-remote_user/ and http://serverfault.com/questions/23273/apache-proxy-passing-on-remote-user-to-backend-server/ |
| [3] | (1, 2) The mod_lookup_identity LookupUserGroups option accepts an optional parameter to specify the separator used to separate group names. By convention this is normally the colon (:) character. In our examples we explicitly specify the colon separator because the mapping rules split the value found in REMOTE_USER_GROUPS on the colon character. |
| [4] | The example of using the The Mapping Rule Processor to establish the set of roles assigned to a user based on group membership is for illustrative purposes in order to show features of the federated IdP and mapping mechanism. Role assignment in AAA may be done in other ways. For example an unscoped token without roles can be used to acquire a scoped token with roles by presenting it to the appropriate REST API endpoint. In actual deployments this may be preferable because it places the responsibility of deciding who has what role/permission on what part of the controller/network resources more in the hands of the SDN controller administrator than the IdP administrator. |